November 30, 2020

Database Startup Failed with ORA-00210/ ORA-15040 after Patching DB System OCI

 Hello Everyone,

Today I am going to share with you the issue that came after applying the patch on the OCI DB SYSTEM.

So after applying the patch on ORACLE_HOME my database instance was not mounting and throwing the below exception in the alert log


Then I switch to GRID home using grid user and check if DISKGROUPS are mounted or not and found disk groups are mounted and the ASM instance also started using the below query:
select group_number,state,name from v$asm_diskgroup;


then check the permission of the ASM disk and found to be correct as "ASMADMIN",
then I check for the permission of oracle binary in ORACLE_HOME and found that the permission has been changed from "ASMADMIN" to "OINSTALL" after applying the patch.

Solution:

As a root user or oracle if you have sudo access go to the bin directory and change the ownership as below:

cd $ORACLE_HOME/bin
chgrp asmadmin oracle
chmod 6751 oracle 

after doing the above changes I am able to start the database.

I hope the above issue helps you solve it, if it happened to you thank you all for reading.

Regards 
Shaik Ahmed Ali


November 24, 2020

How to Recover a drop table in PDB 12CR1 database Using RMAN

 Hi Everyone,

Oracle introduced a new feature in 12c that you can now recover a drop table using RMAN

in this article, we will discuss  how to recover a drop table by the user in PDB

let's start :

before going to the actual topic I will show you how to connect to a PDB in Multitenant Architecture 

Connect to your PDB 

if you want to connect to your PDB there are 2 ways let see below:

1) connect to CDB using sqlplus / as sysdba 

2) alter session set container= PDBNAME

 let see the screenshot:


the other way is to connect using TNSNAMES

let's find out the service name using "lsnrctl status" command 


from the above screenshot, we can see that the service name of PDB is ORCL now let's add in tnsnames.ora as below:


after adding now try to connect as below:


yes connected to PDB using tnsnames.

from the above you can able to connect to PDB, Now let's move to the actual topic of recover a drop table.

check that database is in archive log mode or not:


from the above,, the database is not in archive log mode let's  enable the archive log mode using the below steps shown in SS.


Now our database is in archive log mode. 
connect to the PDB database and create user, table and grant access to them as below :


after creating the table I have inserted some records let's check that.


I have 3 records in the EMP table of SAM schema, 
connect to RMAN and take backup using the below command.
backup database plus archivelog;
after taking backup check the SCN Number of the database.


now connect to PDB and drop the table.


before recovering a table we need to create a directory for auxiliary instance where it will restore the data files.
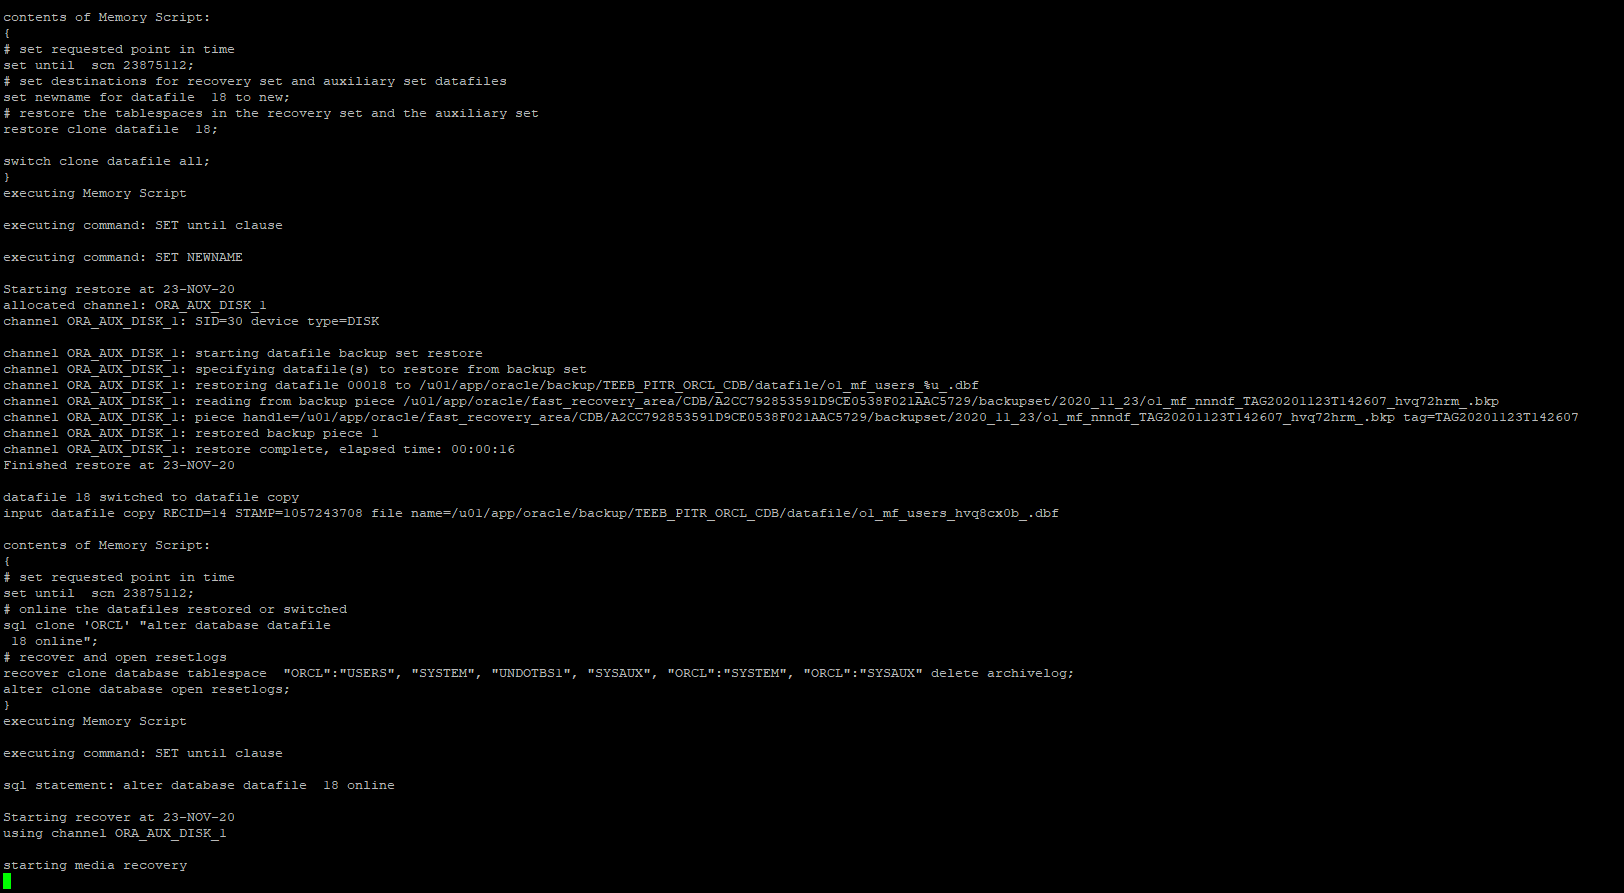
connect to RMAN and run the following command to recover a table. 

RMAN> RECOVER TABLE "SAM".EMP UNTIL SCN 23875112 AUXILIARY DESTINATION '/u01/app/oracle/backup/';

after running the above command I got the below output 


it says EMP not found in the backup because the above command is for NON-CDB and CDB. 
to recover from a pluggable database below is the command

RMAN> RECOVER TABLE "SAM".EMP OF PLUGGABLE DATABAES ORCL UNTIL SCN 23875112 AUXILIARY DESTINATION '/u01/app/oracle/backup/';


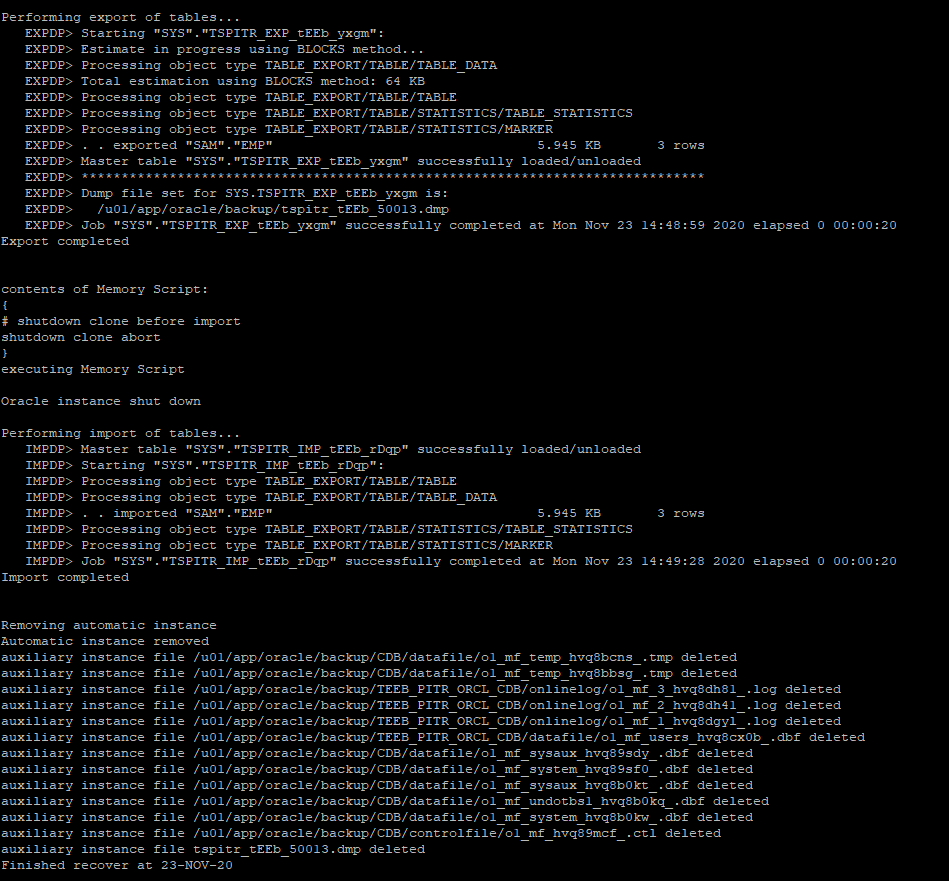
its recover the table and imported as shown in the above SS after imported it deleted all the auxiliary instance with data files and in the background, it using the data pump expdp and impdp to recover a table in 12CR1 database.


From the above SS, you can see that table is recovered with the data. 

Hope you all understood how to recover a table if it's drop accidentally. 
happy reading and give your feedback appreciated

Regards
Shaik Ahmed Ali


November 21, 2020

Upgrade Oracle database Manually from 12.1.0.2 CDB to 19c CDB on Linux

Hello Everyone

In this article, I am going to share with you how to upgrade the 12.1.0.2 database to 19c Manually on CentOS 7.

supported version for direct upgrade to 19c are:

 11.2.0.4, 12.1.0.2, 12.2.0.1, 18

In this example, my source database is 12.1.0.2 and upgrading to 19c, before the upgrade it's better to have a backup so if in case we need to restore.

Let us start the Prerequisite: 

  1. in the first step, you need to install the prerequisite package for installing the 19c software you can install it by running the below command
                      "yum install -y oracle-database-preinstall-19c"


bit explanation before unzipping the software 19c, in 19c there is only a single zip file so if you extract it in some directory for example "/home/oracle/software" then it will be your oracle home for 19c.
create a directory for 19c home where you want to unzip it as below 


After unzipping the zip file  run the runinstaller from 19c home  as below


Now follow the screenshots :


select setup software only as we are upgrading and click next 


select a single instance and click next 


select enterprise edition and click next 


Provide the Oracle base location and click next


Select the groups and click next 


provide the password so that it will run the root.sh scripts automatically and click next or if you want to run manually uncheck it and click next 


here it's checking for prerequisite 


after completion of the prerequisite check, click on install and it will start the installation 


now run the root.sh script after it prompts if you didn't provide the password 


so Oracle 19c software installation is done 

let's start the upgrade process:
 
run the preupgrade.jar file from 19c home as below but before running the jar file make sure using a 12.1.0.2 oracle home using export ORACLE_HOME=12chome  then run the preupgrade.jar file 


after running the preupgrade.jar file from the output you need to perform the pre-upgrade and post-upgrade action according to your output. below is my pre-upgrade actions need to perform 


from the above output, I have 3 tasks to perform before the upgrade 
  1. we can ignore the APEX upgrade 
  2. AUTOFIXUP it will fix when we run the prefixup  scripts as below 
  3. In the Multitenant environment, we must run the pre-upgrade script on both root, and all pdbs 

after performing the pre-upgrade task now time for the action(upgrade)

shutdown the source database (12.1.0.2)

 
now copy the files spfile, listener file, and password file from 12c home to 19c home as below


export the oracle home to 19c and
start the listener and database in the upgrade mode as shown in the below screenshot
and you also need to start the PDBS in upgrade mode using the command
alter pluggable database all open upgrade force;


Now run the upgrade command there are 2 types of command to do it
cd $ORACLE_HOME/rdbms/admin      
 $ORACLE_HOME/perl/bin/perl  catctl.pl
 or
$ORACLE_HOME/bin/dbupgrade


in the above screenshot, you can see it is upgrading the PDBS 


from the above screenshot, the upgrade is completed in 3H 55M
check the output from the upg_summary.log file, if there are any issues solve them and start the database in normal mode with pdbs 


Now proceed to perform the post-upgrade task 


from the above screenshot, my post-upgrade need to do some task like 
  1. upgrade the timezone using DBMS_DST Package
  2. run the symlink script
  3. Gather the fixed object stats
  4. run the post-upgrade script

let us perform the action

  1. upgrade of the timezone you can find HERE
  2. run the scripts as below


after running the post-upgrade fixup script check the invalid objects


if you found the invalid object run the utlrp.sql script and check again as shown in the below screenshot


check the compatible parameter and change to 19c as shown in the below screenshot 


 check the version of the component using the below query :


Finally, change the entry in the /etc/oratab from the 12c home to the 19c home.

so in this blog, you learn about how to upgrade the database to 19c 

Thanks for reading and submit your feedback.