Posted by Shaik Ahmed Ali on November 21, 2020 in 12c to 19c upgrade linux, Upgrade 12c, upgrade to 19c manually | No comments
Hello Everyone
In this article, I am going to share with you how to upgrade the 12.1.0.2 database to 19c Manually on CentOS 7.
supported version for direct upgrade to 19c are:
11.2.0.4, 12.1.0.2, 12.2.0.1, 18
In this example, my source database is 12.1.0.2 and upgrading to 19c, before the upgrade it's better to have a backup so if in case we need to restore.
Let us start the Prerequisite:
- in the first step, you need to install the prerequisite package for installing the 19c software you can install it by running the below command
"yum install -y oracle-database-preinstall-19c"

bit explanation before unzipping the software 19c, in 19c there is only a single zip file so if you extract it in some directory for example "/home/oracle/software" then it will be your oracle home for 19c.
create a directory for 19c home where you want to unzip it as below
After unzipping the zip file run the runinstaller from 19c home as below

Now follow the screenshots :

select setup software only as we are upgrading and click next

select a single instance and click next

select enterprise edition and click next

Provide the Oracle base location and click next

Select the groups and click next

provide the password so that it will run the root.sh scripts automatically and click next or if you want to run manually uncheck it and click next

here it's checking for prerequisite

after completion of the prerequisite check, click on install and it will start the installation


now run the root.sh script after it prompts if you didn't provide the password

so Oracle 19c software installation is done
let's start the upgrade process:
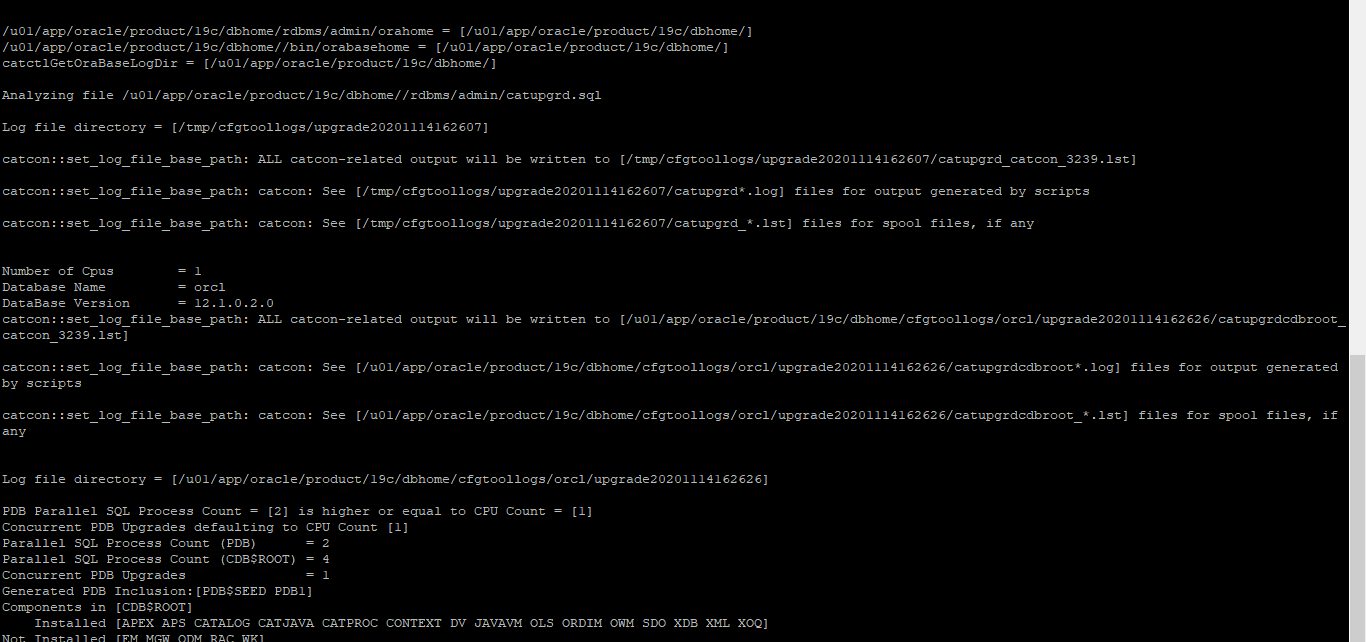
run the preupgrade.jar file from 19c home as below but before running the jar file make sure using a 12.1.0.2 oracle home using export ORACLE_HOME=12chome then run the preupgrade.jar file

after running the preupgrade.jar file from the output you need to perform the pre-upgrade and post-upgrade action according to your output. below is my pre-upgrade actions need to perform

from the above output, I have 3 tasks to perform before the upgrade
- we can ignore the APEX upgrade
- AUTOFIXUP it will fix when we run the prefixup scripts as below
- In the Multitenant environment, we must run the pre-upgrade script on both root, and all pdbs

shutdown the source database (12.1.0.2)

now copy the files spfile, listener file, and password file from 12c home to 19c home as below

export the oracle home to 19c and
start the listener and database in the upgrade mode as shown in the below screenshot
and you also need to start the PDBS in upgrade mode using the command
alter pluggable database all open upgrade force;

Now run the upgrade command there are 2 types of command to do it
cd $ORACLE_HOME/rdbms/admin
$ORACLE_HOME/perl/bin/perl catctl.pl
or$ORACLE_HOME/bin/dbupgrade

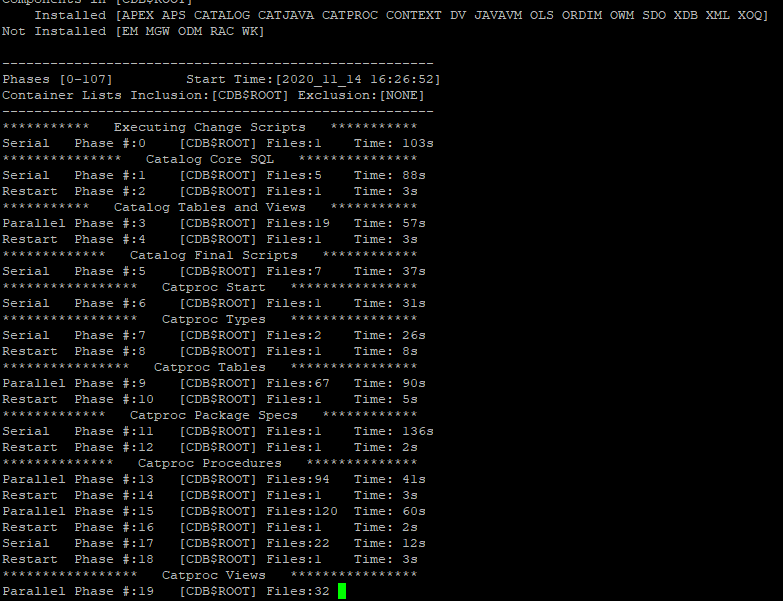


from the above screenshot, the upgrade is completed in 3H 55M
check the output from the upg_summary.log file, if there are any issues solve them and start the database in normal mode with pdbs

Now proceed to perform the post-upgrade task

- upgrade the timezone using DBMS_DST Package
- run the symlink script
- Gather the fixed object stats
- run the post-upgrade script

let us perform the action


after running the post-upgrade fixup script check the invalid objects

if you found the invalid object run the utlrp.sql script and check again as shown in the below screenshot

check the compatible parameter and change to 19c as shown in the below screenshot


check the version of the component using the below query :


Finally, change the entry in the /etc/oratab from the 12c home to the 19c home.
so in this blog, you learn about how to upgrade the database to 19c
Thanks for reading and submit your feedback.


0 comments:
Post a Comment