Posted by Shaik Ahmed Ali on December 16, 2020 in 12c to 19c upgrade linux | No comments
Upgrading a database is always a big task for every DBA in this world but this time Oracle introduces a new feature in 19c for an upgrade which is called "Autoupgrade Utility". More details on the autoupgrade utility you can find HERE.
Supported version for upgrade:
As a source database, you should have a minimum of 11.2.0.4
and as a target, you can upgrade to 19.3.0,18.5.0,12.2.0.1 with Jan 2019 RU
In this article, I will demonstrate how to upgrade the database from 12.1.0.2 to 19.3.0 using the autoupgrade utility.
Steps for Upgrade:
- Install 19c database binaries.
- Download the latest autoupgrade.jar file from Oracle supports MOS Document 2485457.1.
- Create a Config file for the upgrade process.
- Analyze the database using a config file created.
- Deploy the actual upgrade process.
Let us start the Practical:
- Install Oracle 19c database Binaries:
Just for time-saving, I have already installed the oracle 19c binaries, which you can find HERE.
- Download the latest autoupgrade.jar file and replace it with the default one as below
After replacing let's confirm the version as below SS.

For an upgrade, the java version should be 1.8 which is available in "ORACLE_HOME/jdk/bin" so just check the version of java.

- Create the Config file for the DB upgrade as below.

Before creating a config file let's create a directory which holds all the logs file of the upgrade process.

Sample of the config file in which we need to fill the information of the source and target database for an upgrade.
Now let's edit the config file according to our needs as below, as I have only 1 database to be upgraded so updated only 1, if you have 2 databases that need to upgrade you can edit "database number 2" in the config file.

From the above SS, I have edited the config file.
- Time for database analysis let's do it using the below command:
$ORACLE_HOME/jdk/bin/java -jar $ORACLE_HOME/rdbms/admin/autoupgrade.jar -config conifgfilename -mode analyze

From the above SS, we have done the ANALYZE of the source database now check the logs
you can find the logs at the location shown in the below SS.

Now open the Html file using firefox as below and read the file


From the above Html, it shows 1 error which is about the archive log disable


- Time for the actual upgrade (DEPLOY mode)
Now we are ready for the actual upgrade of the database let's do it
$ORACLE_HOME/jdk/bin/java -jar $ORACLE_HOME/rdbms/admin/autoupgrade.jar -config conifgfilename -mode DEPLOY
set the environment to 19c oracle home and run the upgrade in deploy mode
Before running the upgrade make sure the PDB is on read-write mode otherwise, the upgrade will fail as below

let's run the upgrade after the environment set:


My upgrade got failed at the PRECHECKS let's see the log file what is the root cause of the failure.


we have some commands to monitor the status of upgrade using
1) lsj
2) status

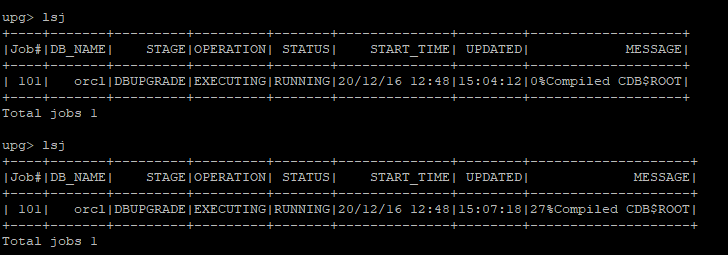
After upgrade, it's compiling the CDB$ROOT


After the upgrade, it starts POSTCHECKS as shown in the above SS.

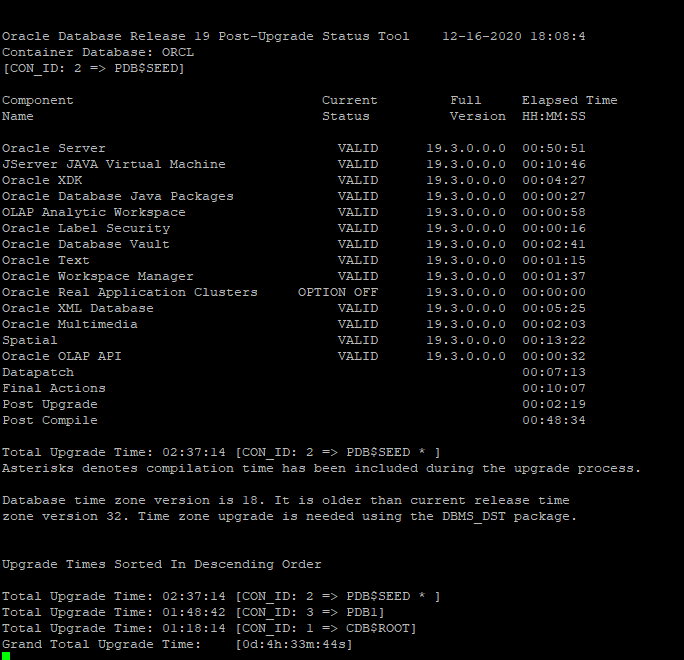
The database has been successfully upgraded using the autoupgrade utility and took 4.5 hours
Now we will check is the time version upgrades and drop the restored point

From the above time zone has been upgrade


we have checked the status of the database and drop the GRP successfully.
If you want to change the compatible parameter please change it from 12c to 19c as below


Thank you for reading and feedback appreciated.
Hope this article helps you in upgrading the database using autoupgrade utility
Regards
Shaik Ahmed Ali


0 comments:
Post a Comment