November 1, 2022

How to Decrypt or Recover the Forgotten WebLogic Admin Password in R12.2

 Hi All,

In this blog post, I am going to share how to recover or decrypt the forgotten WebLogic admin password in Oracle E-Business Suite R12.2

Log in to your application server using the applmgr user and source the run file system

then follow the below steps :

Get the encrypted password from the boot.properties file as shown below 

[applmgr@ebsapps ~]$ cd /u01/applmgr/VIS/fs1/FMW_Home/user_projects/domains/EBS_domain_VIS/servers/AdminServer/security/

[applmgr@ebsapps security]$ cat boot.properties

username={AES}5ygOPqtqFq3F6s5UHUiHIbQtUmSzhNwZnU9QrKbjsZ4=

password={AES}/xtW9bP7wA07YHbynvidcnaSYoYylL0y55v2NflfmoE=

[applmgr@ebsapps security]$


Now let's decrypt the password 

[applmgr@ebsapps ~]$ sh /u01/applmgr/VIS/fs1/FMW_Home/wlserver_10.3/common/bin/wlst.sh

CLASSPATH=/u01/applmgr/VIS/fs1/FMW_Home/patch_wls1036/profiles/default/sys_manifest_classpath/weblogic_patch.jar:/u01/applmgr/VIS/fs1/EBSapps/comn/util/jdk64/lib/tools.jar:/u01/applmgr/VIS/fs1/FMW_Home/wlserver_10.3/server/lib/weblogic_sp.jar:/u01/applmgr/VIS/fs1/FMW_Home/wlserver_10.3/server/lib/weblogic.jar:/u01/applmgr/VIS/fs1/FMW_Home/modules/features/weblogic.server.modules_10.3.6.0.jar:/u01/applmgr/VIS/fs1/FMW_Home/wlserver_10.3/server/lib/webservices.jar:/u01/applmgr/VIS/fs1/FMW_Home/modules/org.apache.ant_1.7.1/lib/ant-all.jar:/u01/applmgr/VIS/fs1/FMW_Home/modules/net.sf.antcontrib_1.1.0.0_1-0b2/lib/ant-contrib.jar:/u01/applmgr/VIS/fs1/EBSapps/comn/util/jdk32/lib/dt.jar:/u01/applmgr/VIS/fs1/EBSapps/comn/util/jdk32/lib/tools.jar:/u01/applmgr/VIS/fs1/EBSapps/comn/util/jdk32/jre/lib/rt.jar:/u01/applmgr/VIS/fs1/EBSapps/comn/shared-libs/ebs-3rdparty/WEB-INF/lib/ebs3rdpartyManifest.jar:/u01/applmgr/VIS/fs1/FMW_Home/Oracle_EBS-app1/shared-libs/ebs-fmw/WEB-INF/lib/ebsFMWManifest.jar:/u01/applmgr/VIS/fs1/FMW_Home/Oracle_EBS-app1/shared-libs/ebs-appsborg/WEB-INF/lib/ebsAppsborgManifest.jar:/u01/applmgr/VIS/fs1/FMW_Home/oracle_common/modules/oracle.uix_11.1.1/uix2.jar:/u01/applmgr/VIS/fs1/EBSapps/comn/java/classes:/u01/applmgr/VIS/fs1/EBSapps/10.1.2/forms/java:/u01/applmgr/VIS/fs1/EBSapps/10.1.2/forms/java/frmall.jar:/u01/applmgr/VIS/fs1/EBSapps/10.1.2/jlib/ewt3.jar:/u01/applmgr/VIS/fs1/EBSapps/10.1.2/j2ee/OC4J_BI_Forms/applications/formsapp/formsweb/WEB-INF/lib/frmsrv.jar:/u01/applmgr/VIS/fs1/FMW_Home/utils/config/10.3/config-launch.jar::/u01/applmgr/VIS/fs1/FMW_Home/wlserver_10.3/common/derby/lib/derbynet.jar:/u01/applmgr/VIS/fs1/FMW_Home/wlserver_10.3/common/derby/lib/derbyclient.jar:/u01/applmgr/VIS/fs1/FMW_Home/wlserver_10.3/common/derby/lib/derbytools.jar::

Initializing WebLogic Scripting Tool (WLST) ...

Welcome to WebLogic Server Administration Scripting Shell

Type help() for help on available commands

wls:/offline> domain="/u01/applmgr/VIS/fs1/FMW_Home/user_projects/domains/EBS_domain_VIS/"
wls:/offline> service = weblogic.security.internal.SerializedSystemIni.getEncryptionService(domain)
wls:/offline> encryption = weblogic.security.internal.encryption.ClearOrEncryptedService(service)
wls:/offline> print encryption.decrypt("{AES}/xtW9bP7wA07YHbynvidcnaSYoYylL0y55v2NflfmoE=")

your password will show as my password is marked red in the below screenshot.


Hope this article helps you in decrypting the WebLogic admin password.

Thanks for reading.

Shaik Ahmed Ali.
Regards.


October 25, 2022

How to Provision a Compute Linux Instance in OCI

 Hi All,

This blog post will show you how to launch an OCI Compute Instance.

Once you log in to the OCI Cloud using your tenancy, click on compute on the top left side and then Instance as shown below.


After you click on the instance it will take you to the create instance page see below.


Once you click on the create instance button it will ask you to fill in details like
Instance Name
Choose Compartment
Choose AD (Availability Domain) 
Fault Tolerant
Shape and OS 
Networking 


From the above screenshot, you can see that you can add an SSH key or OCI will generate for you, so you can choose anyone.
If you choose the option "Generate SSH key", download it because it is used for logging in to the server.


Once you have done with all the details click on create, it will be in a Provision state.
After a while, the Compute Instance will be up and running as shown below in the Screenshot.


You have successfully created a Compute Instance in OCI.
You can start, stop, reboot, and terminate a Compute Instance from OCI Console.

Thanks for reading.

Regards
Shaik Ahmed Ali


October 24, 2022

ORA-02085: database link String connects to string

 Hi Everyone,

after creating the database link, I was trying to fetch record from the remote database server but receive the following error as below 

ORA-02085: database link String connects to String

Solution:

Description

ORA-02085: database link string connects to string

Cause:

a database link connected to a database with a different name. The connection is rejected.

Action:

create a database link with the same name as the database it connects to or set global_names=false.


If the global_names is set to TRUE, then run the below command:


Alter system set global_names=FALSE scope=both;


then recreate the database link.


It worked for me.


Hope the Solution worked for you as well.


Thanks for reading 

Shaik Ahmed Ali


October 16, 2022

About Oracle Autonomous Database on OCI

 In this article, I will explain you about the new database service which is Autonomous database (ADB) in OCI.

Oracle Cloud provide a new set of databases as a service called the Autonomous. it is a part of database which can automate the DBA administration task such as creation, patching, upgrade, performance tuning, backups and daily maintenance task while the database is up and running.

Oracle Autonomous is a cloud database which uses machine learning to automate database management task traditionally perform by DBAs.

With Oracle Autonomous database, oracle makes it easy and quick for you to have a secure, fully managed, database service in oracle cloud.

In Oracle Cloud Infrastructure (OCI), Autonomous Database comes with 3 varieties of DB.

 a) Oracle Autonomous Transaction Processing (For Transaction Processing Workloads)
b) Oracle Autonomous Database Warehouse (For Data Warehouse Workloads)
 c) Oracle Autonomous JSON Database (For NoSQL Database which uses JSON)


Autonomous database is available on Oracle Cloud Infrastructure (OCI) for shared and dedicated deployments as describe below and On-premises as Exadata Cloud@Customer and dedicated region as Cloud@Customer.

Dedicated Infrastructure: 

If Autonomous database is deployed on dedicated Exadata infrastructure it uses its own Exadata rack minimum quarter rack. A completely dedicated compute, storage, network and database service for only a single tenant.

Shared Infrastructure: 

A simple and elastic choice. oracle autonomously operated all aspects of database.
if Autonomous database is deployed on a shared Exadata infrastructure, then oracle charged you as per OCPU and Storage actively used. 

Cloud@Customer:

The Cloud@Customer means an autonomous database on dedicated Exadata infrastructure in customer datacentre.

Features of Oracle Autonomous Database:

The Autonomous Database is revolutionizing database which fully automates the management of database lifecycle and enables you to pay less and ensure data safety when compared to traditional database.

You have auto indexing feature in oracle autonomous database which ensures you to provide a better execution plan to optimizer for executing the SQL by monitoring the application workloads and creating, maintaining the index automatically. Auto indexing is disabled by default in ADB.

To enable the auto indexing feature, use the below command:

EXEC DBMS_AUTO_INDEX.CONFIGURE('AUTO_INDEX_MODE','IMPLEMENT').


In Oracle Cloud Infrastructure (OCI) you have an auto scaling feature for ADB as well where you can scale in or scale out the OCPU and shrink the Storage according to your workload as shown in below screen shot.    


The Autonomous database is a self-driving, self-secure, self-tuning, self-repairing, and self-scaling.  


How do you migrate On-Prem Database to Autonomous Database (OCI)? 

Premigration Steps/Tasks:
 
During migration legacy features automatically get replaced, some of them are listed below.


Also, oracle provide us with a tool called Cloud Premigration Advisor Tool (CPAT).
by running the CPAT against the source database it will validate all the objects, parameters and features and generate a report in text or JSON format and make ensure it is ready for ADB. if you find any error or red flag, please resolved it before migration.

Migration Methods for ADB:

First of all, when it comes to autonomous database all migration is logical, it means you are migrating the data not the database so TTS and RMAN are not available for the migration.

There are many ways to migrate on-prem database to oracle cloud (OCI) according to your data size, some of them are:

1) Data pump ( expdp/impdp)
2) Move To Autonomous Database (MV2ADB) Tool.
      The Move to Oracle Autonomous Database (MV2ADB) tool is designed to enable you to quickly upload source file to the cloud and supports Oracle Cloud Infrastructure APIs and command-line interface (oci-cli).
3)SQL Developer
4)SQL Loader
5)Zero Downtime Migration (ZDM).
6) Database Migration Service (OCI).

Database Migration service is a fully managed, easy to use database migrations into oracle cloud.


Thank you all for reading my blog on Autonomous Database (ADB). 

May 4, 2021

How to create a database link in oracle database.

 Hi Everyone,

Database Link:

A database link is a schema object in one database that enables you to access objects on another oracle database.
the target database can be an oracle database or any ODBC compliant database such as MySQL and MS SQL(heterogonous service).

  we can create 2 types of database link:

1. Private 
2. Public

1.Private database link: 

 private database links are only visible to the owner of the link.

2.Public database link:

Public database links are the link that is visible to all the users in the database.

Let's Create a database link:

the command used to create a database link is the below:

CREATE DATABASE LINK dblink_Name
    CONNECT TO username IDENTIFIED BY password
    USING '(DESCRIPTION=
                (ADDRESS=(PROTOCOL=TCP)(HOST=hostname)(PORT=1521))
                (CONNECT_DATA=(SERVICE_NAME=servicename))
            )';

another way to create is to add the target entry in tnsnames.ora file so the command is as below


CREATE DATABASE LINK dblink_Name
    CONNECT TO username IDENTIFIED BY password
    USING 'tnsnames';


If you want to create a public link just add the PUBLIC after create as below:

CREATE PUBLIC DATABASE LINK dblink_Name
    CONNECT TO username IDENTIFIED BY password
    USING '(DESCRIPTION=
                (ADDRESS=(PROTOCOL=TCP)(HOST=hostname)(PORT=1521))
                (CONNECT_DATA=(SERVICE_NAME=servicename))
            )';


How to access the table or views on the remote database  let's see:

Select * from remotetable@dblinkname;

In this article, you learn how to create a database link.


Thank you for reading and feedback appreciated.


January 6, 2021

How to Provision Autonomous Transaction Processing(ATP) database in OCI

 In this article, I am going to demonstrate the provision of an Autonomous Transaction Processing(ATP) database in OCI.

Before going to the provision let me give you a brief about the Autonomous Database.

Autonomous Database:

Autonomous Database provides an easy-to-use database that eliminates the administration of database as it can recover from any failure without downtime, can deliver fast query performance, we can also scale up and scale down the CPU and Storage instantly without downtime, can gather the statistics and optimize the database workload.

In OCI we have 2 types of Autonomous Database
  • Autonomous data warehouse (ADW)
  • Autonomous Transaction Processing (ATP)

Let's Start The Practical:


Login to the OCI Console and click on the top left side as shown in the below SS.


Now click on the Create Autonomous Database


Now Provide the details as shown above in the screenshot
  • Select Compartment 
  • Display Name
  • Database Name
  • Transaction Processing
  • Shared Infrastructure 


As per the above SS, you need to provide the following:
  • Select DB version, I have selected 19c
  • OCPU
  • Storage
  • Admin password required to login to the database.


From the Network access, you can select anyone from the above 
I recommend you to select the Virtual Cloud Network as it is more secure and allows access from the provided network or IP. 

If you select Virtual Cloud Network you need to provide the VCN, Subnet, and Network Security Group(NSG).

From licensed type select according to you like Bring Your Own License(BYOL) or License Included


You can also provide the tag from the advanced options
After all this information you provided select "Create Autonomous Database"


The above SS shows the ATP is Available and ready to access.
Thank you for reading the article and appreciate your feedback.


December 26, 2020

Step by step to configure the Oracle dataguard in 19c

 Hi in this blog I will demonstrate step by step procedure to set up the Dataguard in 19c using an Active data guard without backup.

Let's start the preparation:

My Environment:


On Primary Side:

first, let's Check the Archive log enable or not 

It enables and now checks the force logging is enabled or not:

Now I have also enabled the force logging  as shown in the above screen

Adding the standby redo log files(SRL)


Now, setup the data guard parameter on the primary side:


Adding the tns entry and listener file 


My tnsnames.ora looks like as above and tnsping result below


Creating the Password file and pfile for standby in the primary


Let's copy the password file,tnsnames. ora and pfile to the standby database.


On the Standby Side

After copying the files to the standby let's edit the pfile and create the required directory for the instance to start.


As per the above SS, we have created the directory structure now move the other two file which is tnsnames. ora and password file to there location


Now let's start the standby database in nomount using the pfile we edited.


Connect to RMAN and start duplicating the database using the below command:

duplicate target database for standby from active database nofilenamecheck;


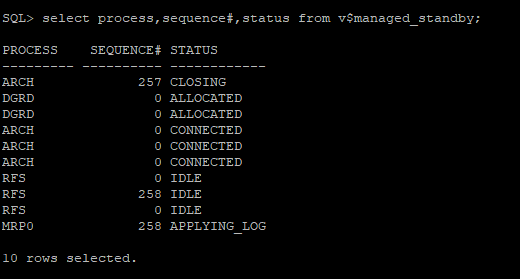
Yes we have finished the duplication and now start the Managed recovery process(MRP) to start the redo apply, let's check it


and now enable the parameter  "log_archive_dest_state_2" in the primary and move the logfiles.
yes, it's applying now perform the archive log switch and check if it's applying or not .


It's applying the redo logs and the data guard is sync using SQL Apply.
Thank you for reading and feedback appreciated.